Pages

15/12/2011

Who's Angry?

My second request but first cake made in Singapore!!


So I had a request from work and thought I'd give it a try and use fondant for the first time. It literally took 3 weekends of prep since I had minimal tools to work on. A small oven that only bakes one 8" cake at a time was challenging since I had to think the logistics side of things.

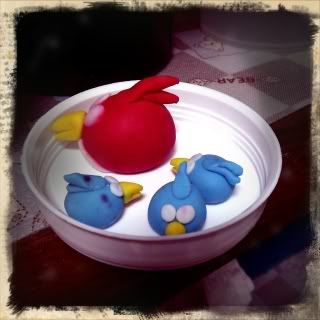
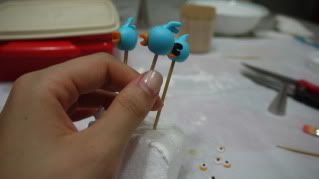
One weekend I tried playing with fondant to see how it behaves as I am aware that they can melt if the humidity is too much. I realised that the birds were shaped round and were all flat by the time they dry. As well as it took quite some time to get the right colour too.


Photobucket

Flaaattt botttoomm

My brain started to boil with ideas I wanted to do and the moment I heard the number of people who will be eating the cakes I too was keen to make the cupcakes!

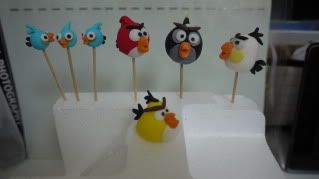
So the following weekend I made the models and the topping for the cupcakes


Photobucket

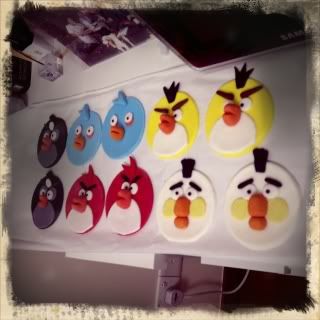
Had to keep them in my bedroom to keep it dry and cool. Unfortunately the cupcake toppings were still 'wet' when I took them out a week later. I should have just left them out to dry..

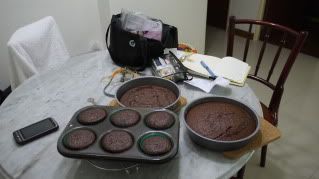
Following weekend - baked the cakes the night before (I forgot sugar in one!! Argh) but it took quite some time seeing that my oven can take one cake at a time. I planned to make 2 layers of 8" cake and 12 cupcakes. I saved more time by shaping the cakes the night before too.

Photobucket

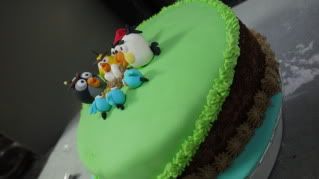
And finally on Sunday, spend 8 hours decorating

Photobucket

Getting there...had to redo this as I dusted the sides with chocolate powder and it all smudged when I transfered the cake, boo!
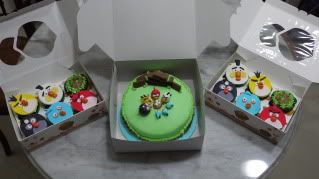
Photobucket

Ready to go!

Anyhoo, she was happy, though I wished her son's birthday didn't fall on a Wednesday as fondants are hard to keep if you don't have a dry space. So yeah, it kinda melted and the fondant was so sweet that it made up for one of the cake base that didn' have sugar in it =P

09/08/2011

Baked Peach Cheesecake

Back to basics!! Thought I'd used the cream cheese in the fridge up before it starts to mould. This recipe is taken off directly from Philadelphia's cook book.

Photobucket

Photobucket

The muffin tray I have couldn't fit into the oven so I had to think up of an alternative quick! Thank goodness for those disposable aluminium cups....and I reckon it's good to reuse it too

Photobucket

Kitchen just got busier again =)

Photobucket

Makes 6 muffin size tray

02/08/2011

Milo Macaroons

Photobucket

With cream cheese filling! And more Milo of course...this is base on a French Recipe instead as I wasn't adventurous enough to use the Italian recipe (consist of syrup base sugar boiled)

Gosh, the beginning was easy, but the ending was so difficult! I wasn't sure whether I over fold the eggs, as well as the Milo itself started to clump each other. And different trays give off different heat so some baked much nicer than others.

Photobucket

Photobucket

I only manage to make a few since most of them was stuck to the baking paper. Didn't realise that there was a handy tip from this post...had I known earlier, I wouldn't chuck most into the bin =S

And most of them was stuck to the parchment paper so I only saved less than a quarter from the rest of the batter

Makes about 35-40 macaroons an inch wide

(Courtesy from Cake Journal's post and lots of picture steps from cooking-ez's post)

02/05/2011

Orh Nee Cheesecake aka Taro Cheesecake

I've been meaning to make this ever since I stumble across the recipe in the local Malaysian newspaper (The Star) in March...She is a housewife and wrote a book on recipes. I got so excited when a blend of Asian ingredient is fused with Western.

Photobucket

Probably not as nice as her recipe but it's a first try!

Who would have ever thought it turned out yummy....

I placed a rather large base as I wanted to make my own cookie dough base (Oreos are a waste since the cream would be thrown away). I used Milo powder :) but I didn't realise that it was actually twice the size of what I needed! So I had to ratio and half the cheese batter down. Turns out just as delicious. YUM.


Before...............After
Oh as well as we are on this post, I was figuring out the difference between Taro, Yam and Sweet Potato. Turns out we've been mis using the word Yam quite a bit! Glad to get that out of the way.

Photobucket
Pureed Taro


Makes one 8" cake

16/04/2011

Jellies galore - Pandan and Rose flavour

Hmm, think I'm obsessed in the road to perfection of making layered jelly. It's just so tricky! I had to study abit on how long does it take before the 'soup' turns into jelly while I leave it in the pot and wait for each layer to harden.

Photobucket

It ain't easy when you try to keep it warm either, the water in the pot slowly disintegrates. Perhaps a double boiler would work by steaming the mix, keeping it moist and warm while waiting for each layer to harden


3 layers was already tricky...I wonder how some people can do so many layer. There's so much patience!

And I love using Konnyaku Red Man! It's got a lovely texture and health benefits :D


Anyway, here's a recipe below...similar to my previous post, it's a 1:5 ratio, 5 being for water. I made 12 mini jellies using my mini cupcake tray, but I think this does a rough 8" cake.


(Courtesy of My Kitchen Snippets post and Wikihow's 9 steps to make a rainbow jello)

09/04/2011

Pandan Layered Cake

This is my second time making it and it stood up!! Thank goodness for that =D

Photobucket

The verdict? It was abit too sweet on the jelly side but overall it is the texture I want. I was extremly tired when I made the cake as I was pretty much spilling stuff all over the kitchen and knocking things off. One thing that really taught me a lesson was not to bring the oven heat at normal conditions because this was a tiny oven. So I did end up burning the top layer before cooking the inside.

Photobucket

Thank goodness we don't need the top layer. Cooking the jelly mix went quick too, had to react really quickly before it started to harden up.

Anyway, here are the wonderful ingredients if you're thinking of attempting this.

Makes one 8" cake

(Courtesy of Pinkie Lollipop, Table for 2 and Peng's Kitchen's similar recipes)


06/03/2011

Layered Fruity Jelly

Righty ho!

I was being quite adventurous this round with jelly as I have been meaning to make a layered one consisting of a fruits and something milky. With jelly layers, it's always nice to have clear layers (for the lighter taste) and a creamy layer in between. SO, I thought watermelon might go well with honey dew divided by a layer of coconut milk.

But I did a blonde moment...I bought rockmelon instead....oh well.

I have to admit I was more nervous making this to baking as I was conscious on the result itself. Some packets results in soft jelly which is not what I want.Yes, the texture of the jelly depends on the amount of gelatin one uses. So far, I have made a couple which are still soft..


The verdict. It was quite sweet even without any sugar

Thank goodness for Konnyaku brand, it gave the right texture I want. Moreover, I was surprise that the powder itself has health benefits...it does have some directions as to how much water and powder to use. As for this brand, the ratio of powder to water is 1:5

I was thinking of being very adventurous and make several layers, but I refrained and started simple. Anyway, I had to cut up the fruit from scratch and blend them into juice before I turn them into jelly...so there was quite abit of work to do that night.

Turns out that I did a good job in each layers, but they separated........which means that I waited abit too long before pouring the next layer. Oh well, lesson learnt!

Other than that, if you're lazy, no harm in buying juice of the rack ;)

13/02/2011

Bak Kwa aka Pork Jerky


My first attempt!!

Photobucket

And it wasn’t as hard as I thought…fun bit was flattening out the meat. I can’t believe how over rated and expensive it has become to buy these things and they are also too chewy to bite.

Then again, it is meant to be a jerky…I like my texture softer and tender though. The moment I pop it into my mouth, it was yummier than I thought from the way I cook it!

I initially used this recipe for the ingredients but stumbled across another which has a bit more ingredients and will attempt to use it in the next round. In terms of the baking process, it all depends on one’s oven but the more you ‘dry’ the meat, the closer the meat will form into ‘jerky’ like texture.

Courtesy of My Kitchen Snippit's post and soyandpepper's post)

Photobucket

Photobucket

Makes about 450g of jerky

26/01/2011

Mango Sponge Cheesecake

Heh, as I got bored of eating the plain old sponge cheesecake, someone suggested ‘hey why not add a little flavour to it?’ Well, one of my lovely baking buddy made us a no bake mango cheesecake and it was absolute delicious (although she did complain she added too much gelatin and made the base abit too hard to bite).

Photobucket

But I got myself and oven! And yes I decided to fully utilize it. My other half loves Japanese sponge cheesecake so off I went.

The thought of being health conscious has always been there so the proud past of this recipe is that it’s much healthier than the normal Japanese sponge cheesecakes. I replaced the milk and lemon juice for yogurt as it gives the same tangy smooth flavour (as well as I wanted to incorporate as much mango flavour as I can).

Makes an 8” cake

Ingredients
  • 125g cream cheese
  • 75g sugar
  • 35g flour
  • 10g cornstarch
  • 1 tsp vanilla essence
  • 1/2 tsp mango essence / extract
  • 60ml blended mango juice (less water the better) or 100ml mango yoghurt
  • 25ml oil
  • 4 eggs
  • Pinch of salt

Method
  1. Follow my Japanese sponge cheesecake post
  2. Bear in mind: to fill the water bath as minimal as possible as the cake batter will cook much slower if there’s too much water in the bath.
  3. For a small convectional oven, bring the temperature to 100degC

19/01/2011

Along came an Inspiration

And so I received an invitation for another online competition. And this time, it's not just about cupcakes but it is the quest to make the best DESSERT!

I hereby introduce you..


Let the creativity begin...


Related Posts with Thumbnails
 
^

Powered by BloggerKitchen Virgin til 27 by UsuárioCompulsivo
original Washed Denim by Darren Delaye
Creative Commons License